Posts

Showing posts with the label year_3

major project - submission 03/06/2021

Image
               Lighting & Render Samples by Gravevelgra on Scribd Major Project Making of 2.0 by Gravevelgra on Scribd The Magician’s Nephew My project is an environmental animation inspired by "The Magician's Nephew" showing, the architecture of the Victorian/Edwardian styles and overlapping both these. The concept was to produce a 1-2 minute animation with the set being inspired by this Narnian book. I was aiming to produce an interior to represent the sense/feel of the book. My goal for the project was to depict the era of the book but also adding my personal interpretation of the concept of the book for the set. One of my set goals was to texture the set in a watercolor style similar to the way the initial book's illustrator had. This I felt came across. Another goal for the project was to have it running for a minimum of 1-2 minutes and, with smooth transitions. minor:  https://coyleloughran.blogspot.com/2021/01/minor-...

major project interim reveiw

Image
  interim powerpoint minor animatic

major project- texture test (small boxes)

Image
  overview of the textured samples                                                               now I am on the stage of texturing objects & my set, I'm trying to make a book-like effect for the room in refection to the illustrator of the Narnia books ' Pauline Baynes. I'm not sure how to approach this but at the moment I am looking into a watercolored texture for the set & items. objects that is going to be in close-up shot will be getting extra detail compared to the background or far-off objects. 

minor project-reflective statement

 I found the minor project to be one of the tougher projects after completing the premise, the reason behind this is mainly due to the modelmaking as compared to before I was initially doing more character-based modeling is moving on to more environmental based item and designs. the initial design stage and researching wasn't too harsh for me to follow as thanks to Premise only had a general idea of where I want to go with my work, one of the major setbacks I had during the minor project time scale was the cutback of the initial set and what was can be implemented into it so instead of doing an entire street leading up to a singular attic room it was more streamlined down to the bare essentials of what was going to be shown from the book even the eaves that the book mentioned the children going through to get to the uncle's room in the first place.  after I had the initial objects modeled mapped out another painstaking process was the layout of the room on which I was quite me...

Minor project-hand in

Image
animatic   "making of presentation" description of project Name of the project: The Magician's Nephew  The goal of this project is to create an environmental animation piece. The inspirations behind it are this piece is the story "the magician's nephew" written by CS Lewis. the objects in the room are based on items from the early 1900's the era of the story, for example, there are not only just main story items like the rings (that are the items to progress the story) but also period based items that add authenticity to the design to make it feel natural for the viewer. to help achieve the standard for the project it will be textured in the same watercolor style as the original book illustrator "Pauline Baynes". the animation will aim to be 1-2 minutes with a smooth transition between shots. Turn-around links to premise submission https://coyleloughran.blogspot.com/2020/07/resit-premise.html https://coyleloughran.blogspot.com/2020/05/premise-...

Minor project- OGR

Image
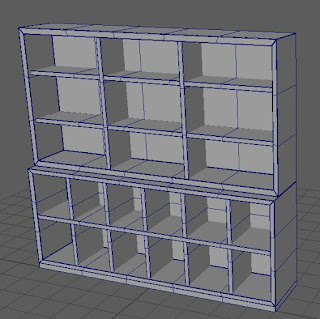
images below are what I've done so far for the objects that will be placed in my environmental project. Even further than you would find a list with all noted object names colour-coordinated in terms of what I would find difficult to model from now towards the end of the project. there are a few more objects are currently in the works that have been pictured but are noted down in the category list at the bottom as in progress. also to note there are objects like maps rugs that are fundamentally squares that I didn't want to include in the initial set of pictures and once I begin texturing will look a lot more different compared to the un-textured models that you see on here. bookcase book cluster camera coffee table desk chair desk lamp door multi-purpose pot "flower pot & copper pot" quil & ink large crystal morter & pestal side table viles wall light todo list the list here is quite simple, the items are divided between minor difficulty medium difficulty...

minor project: production of the models

Image
    since the proposal hand-in, I started working on the models that would be in the set mainly the models that already have some form in the set already. for example here are 3 items that are done and their uvs are layed out. the chair I found quite difficult to make as it has a lot of components to it and I had mild trouble in making the legs and doing the seat, adding the screws to the base of the design with also troublesome but manageable as it was mostly dealing with space and repositioning. the bookcase was one of the easiest models to make at the moment as it was mainly boxes tied together.  the lamp was easy to make but much like the chair was a little tougher to make the uv layout as most of it was made in cylinders and circle platforms so it was trial & error in making the uv set. 

art jam_3-character fusions

Image
we had to choose 2 characters and try to combine them together, one from a game and another from an animation. we also had to give them an action of some thing they are doing.  

maya lesson 5- photogrammetry Part 3/4: Scene Modelling & Option 1 (Static Match) - Non-Compositing (Single Pass) Integration of Objects

Image
part 3 modeling was fairly straight forward after a couple of attempts and changing the lens focus   part 4 "option 1" was adding the additional shapes to the scene followed by adding & adjusting a shadow matte shader to the crate shape and background to get a full 3d picture.

art jam_2 blobs

Image
making character sketches out of the random blobs version 2 wanted to take one further   

maya lesson 4- photogrammetry Part 2: Camera & Scene Matching in 3D

Image
 

Minor_project- propesel

  Animated Short by Gravevelgra on Scribd

Minor project animatic

Image
                   

Maya lesson- 3 Curve driven squash & stretch

Image
this session follows the same fundamentals as we did for the mushroom the method of stretch and squash. The image below displayed in the node editor is the structure of what we have to do for this particular task, as maths wasn't one of my strong suits and this little bit difficult mathematical side when taking information the entirety of spine feeding it into its three separate joints that control how the character would be posed.  

Maya Lesson- 2 No Flip Pole Vector

Image
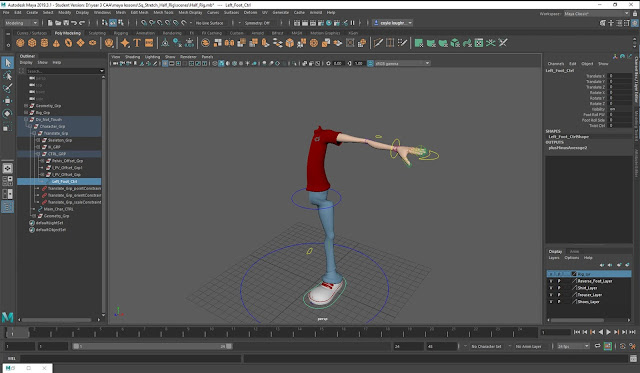
  this tutorial compared to the others is short and was easier to digest as we were adding a no flip pole vector to an existing model. going to the node editor I was able to understand how to generally setting it up, it was setting a twist attribute with the foot control that I was slightly confused with but looking over the tutorial given I was able to get past that.

Art jam- 1 Monster mash

Image
for the art_jam that we had, we had the theme of monster mash and I had got the additional theme of nerd as well, we Rolled online dice for eyes arms, and legs. then we were asked to draw a large selection of monsters to choose from the select 3 from the set. for the 3 we were given another theme "I got a personality trait of Shy" and we take the 3 chosen and draw them in that way. and this here is the final product of the art jam.

Maya lesson- basic squash & streach mushroom

Image
in this my lesson we went over the basics needed to squash and stretch a model in Maya. first of all we had to use located tools to get a distance measurement on the length of the initial spine in this mushroom, the locators are placed on the top and the bottom rings to keep it the same size as I adjust the nodes and once done those rigs will assists in stretching and squishing the model "squished" "stretched" k "nodes" with the node it required a fair knowledge of mathematics which wasn't too hard to decipher but the initial construction and layout of the nodes displayed for you was a fair bit of a challenge as this was deemed the newer and easier way to let model's question stretch without problem but personally, I had ask a fair bit of help to fully wrap my head around of the nodes. the way the mathematics worked for each of the joints is that it was divided into three sections before reaching the joints dividing square routing and multiply, as ...